The Ultimate Image Annotation Tool in 2024: The Complete Guide to New Supervisely Labeling Toolbox

Learn how to use new Supervisely Image Annotation Tool designed for fast and accurate image annotation in Computer Vision.
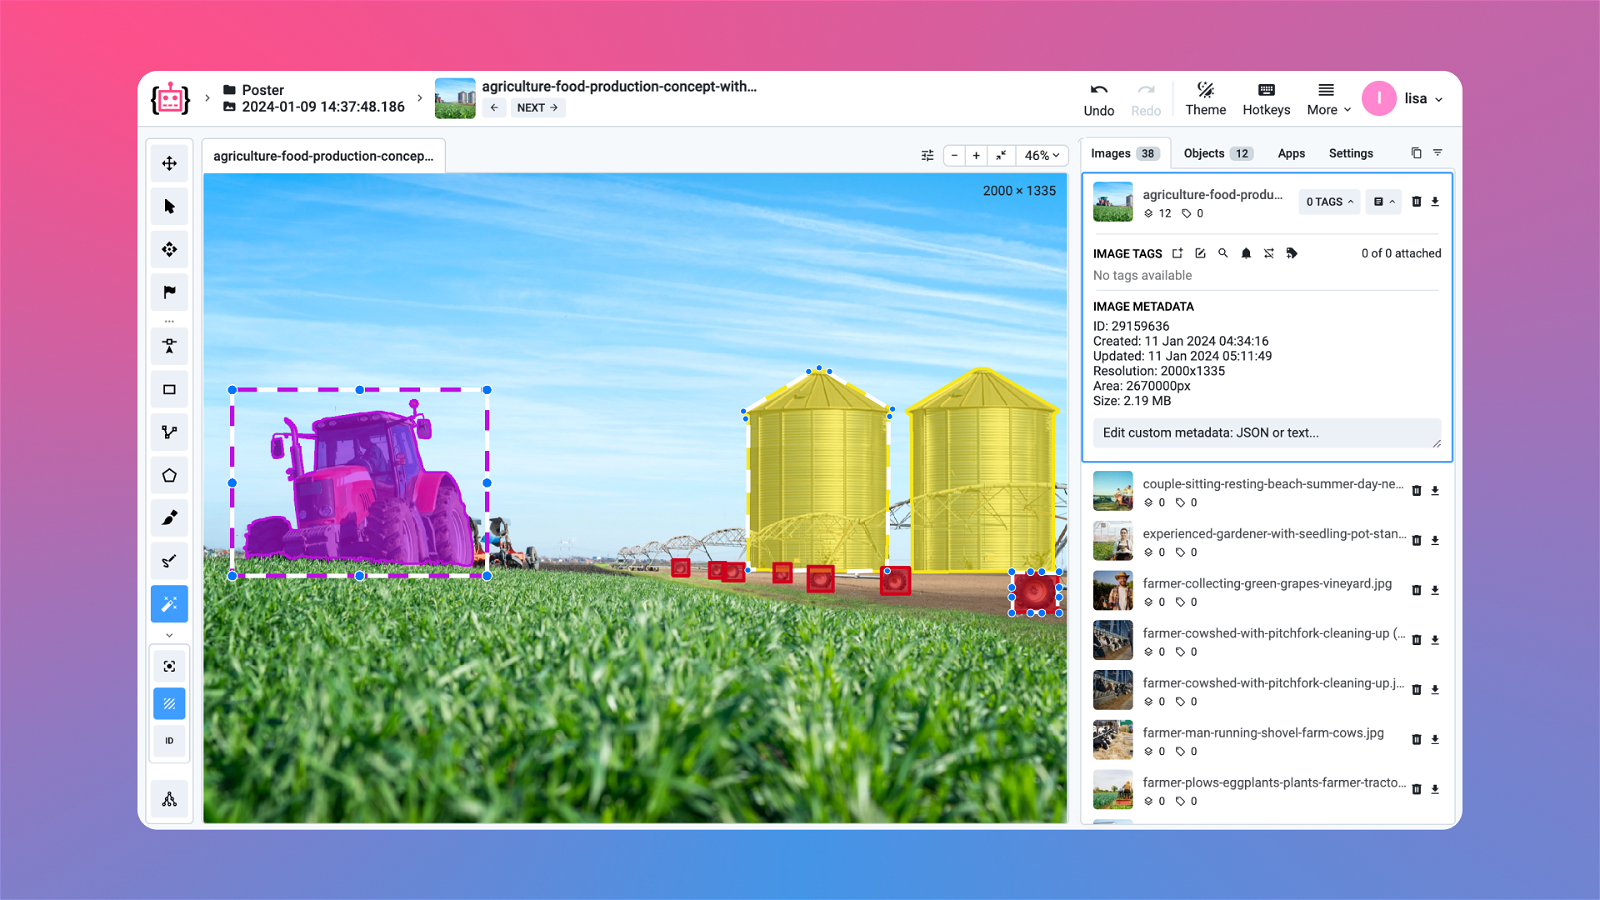
Table of Contents
Foreword
Hello and welcome to the final part of our Image Annotation series! In our previous guides, we explored the features of manual and automatic annotation tools and assessed how practical and effective they were. Today, we're pleased to present an in-depth review of our new improved image annotation tool.
In this review, we will take you through the wide range of features available in the our new Labeling Toolbox, both simple and advanced. Get ready to see how its user-friendly interface and powerful functionality can streamline complex tasks. We'll highlight specific aspects and show you why the Supervisely Image Annotation Toolbox is the industry's best tool for building custom Computer Vision datasets.
Whether you're a seasoned professional looking for efficiency, or a beginner eager to learn, this blog post will shed the light on the significant advances our developers have made in streamlining the annotation process. Stay tuned for more updates about what's next for Supervisely!
Introducing New Image Annotation Tool
The Supervisely Platform is pleased to announce a major upgrade to our Image Labeling Toolbox. This latest update is the complete transformation, setting a new standard in image annotation performance with its comprehensive redesign and advanced features.
Although manual image annotation may seem complicated at first, our tool has made the process easier and more efficient by leveraging the latest AI models for automatic image annotation. It is not only more user-friendly but also significantly boosts annotator's productivity. Now Labeling Toolbox is more intuitive and convenient than ever.
Key features of New Image Labeling Toolbox
-
Web-based interfaces - you just need a browser.
-
Fully customizable interface with easy-to-tune visualization settings: light and dark theme, flexible layout, multiple image view modes, multi-spectral view and grid.
-
Supports complex image formats: high-resolution images, high-color depth images with 16-bit per pixel or more, customizable image visualization settings, filter images with conditions, additional image metadata, restore mode and undo/redo functionality.
-
Advanced labeling capabilities: multiple annotation tools - Bounding Box, Polygon Tool, Brush and Eraser Tool, Mask Pen Tool, Smart Tool, Graph (Keypoins) Tool, effectively supports 1000+ objects per image, image and object tags and attributes, customizable hotkeys.
-
Collaboration and workflow management features for large annotation teams.
-
Integration with various Neural Networks and AI-assisted annotation tools.
-
Effortless data import and export for seamless sharing across platforms.
-
Compatible with medical, NRRD, NiFTI data.
... and many other cool futures described in this post!
In an extremely short period of time, the updated Labelling Toolbox has been widely adopted, with many users experiencing its benefits first-hand. The new features have been seamlessly integrated and now users are actively utilizing the tool's capabilities to improve their annotation workflow and achieve the best results. Sign up and try it yourself..
Intuitive layout
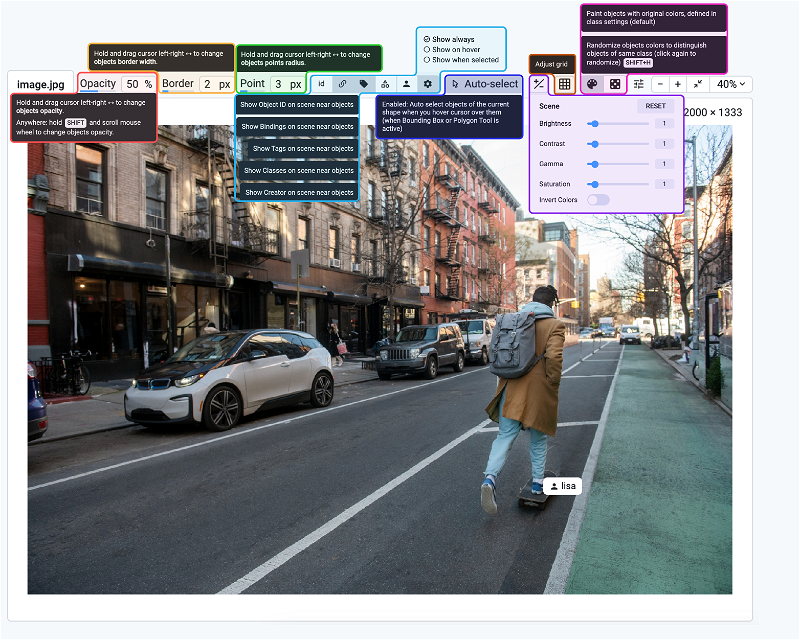
 Layout components of the new Image Labeling Toolbox
Here's an explanation of what you see in the image:
-
Basic settings, such as history of operations, theme, a hotkeys map and more useful features.
-
Working annotation area for image and its labels.
-
Objects panel with additional information like classes and tags.
-
List of images in your dataset, list of additional apps you can embed into the labeling toolbox, visualization and other settings.
-
Annotation tools you can use for labeling.
Customizable Layout
The interface is fully customizable. Users have the liberty to drag-and-drop these windows, resizing and repositioning them, ensuring that their layout is perfectly tailored to their preferences. This feature is often lacking in other annotation tools, which undoubtedly sets our tool apart in terms of usability.
Best Manual Labeling Tools
Even if you use the Neural Network to pre-label the data or AI-assisted model for annotation, you still need the manual tools to correct model mistakes or create test and validation datasets to evaluate your model's performance. Manual annotation process if time consuming thus the tools are well-optimized to be more intuitive and require as little user actions as possible.
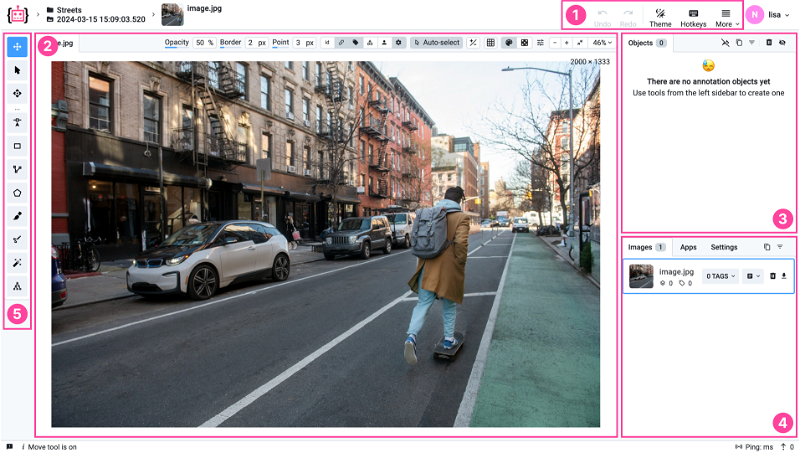
The toolbar serves as a panel offering essential tools for completing different annotation tasks:
Each tool represents various shapes and functions, enabling users to create precise annotations that cater to diverse needs. Every tool in the toolbar is meticulously crafted to address specific annotation requirements, ensuring there is a dedicated solution for any type of object or labeling scenario.
 Supervisely complete set of image annotation tools
Successful image labeling requires much more than just annotation tools like brush or rectangle. Supervisely has a comprehensive set of features that distinguish it from yet another labeling editor.
To fully explore the key features, benefits and functionality of each tool available in the toolbar, we recommend studying our comprehensive guides on how to use these tools.
Bounding Box
Bounding boxes are rectangles with associated classes used in object detection tasks to identify and localize different objects on images. Bounding boxes are precisely defined by coordinates that indicate the position and size of the object.
Precise Localization: Allows accurate determination of object position and size.
Easy Interpretation: Provides clear geometric contours for objects, making it easy to understand the results of object recognition.
Compatible with Different Models: Object detection Deep Learning models predict bounding boxes, this is one of the most popular task in Computer Vision. Consequently, training data for these models can be exported in all popular annotation formats.
Check our complete overview to know, how you can use Best Bounding Box Image Annotation Tools For Object Detection.
Polygon Tool
Polygon is the manual annotation tool outlining object boundaries by connecting points to create accurate polygonal shapes.
Annotation Flexibility: Unlike bounding boxes, Polygons can have any number of points, allowing flexible and more precise annotation for object boundaries with diverse shapes.
High Accuracy: Particularly useful for precise labeling of complex or irregular object structures, ensuring high annotation accuracy.
Advanced Features: Offers quick creation, fine-tuning, simplified editing of single points and polygon parts, snapping to existing object boundaries, automatic point placement, and high flexibility in customization and modification of polygon structures.
Get to know with Polygon Annotation Best Practices for Semantic & Instance Segmentation.
Mask Pen Tool
Mask Pen Annotation Tool is a versatile tool merging polygon and brush features for precise mask creation, enabling users to switch seamlessly between modes and adapt annotation methods for object segmentation. Can be used to create training datasets for Semantic and Instance Segmentation models.
In addition, the native support of masks allows to upload of segmentation model predictions directly to the annotation platform for editing and reviewing which makes the auto pre-labeling workflow for segmentation masks even more effective.
Versatility: Combines polygon and brush / eraser functionalities, facilitating efficient annotation of objects with varying shapes.
Flexibility: Allows easy switching between modes (brush or polygon), and enables addition or removal of mask parts as needed. Provides creating or filling segmentation holes with a single click.
Mask splitting: Supports a mode to split the mask into two objects for segmenting complex objects and their internal parts.
Learn how to use Mask Pen annotation tool as a combination of polygonal contours and free-form drawing contours with our Mask Pen Annotation Tool for Object Segmentation in Supervisely complete guide.
Brush Tool
Brush Tool is used for Image Segmentation, allowing users to create free-form masks for diverse objects. Size scaling is applicable to various scenarios from irregular shapes like rot on a tree leaf to simpler tasks like selecting circular objects such as road signs. It optimized to work with huge resolutions and allows to work with hundreds of masks simultaneously on the scene.
Customizable parameters: Flexible parameters, such as brush / eraser resizing, ensure effective segmentation of objects of varying complexity and sizes.
Collaboration with other tools: Work effectively with other annotation tools such as Pen tool and Smart Tool to speed up the performance of the segmentation process.
Segmenting Object presented by separate parts: Lets you select scattered, separate mask parts of an object in the image, even if they're not connected. Separate segments of the object will be on a single object mask.
Optimized features: The ability to quickly fill segmentation holes with a single click, and the ability to use Polygon Split mode to split masks.
Discover how to annotate objects of any complexity by creating freeform outlines using the Brush annotation tool in Brush Annotation Tool: your must-have for Object Segmentation review.
Fast Auto-Segmentation with SmartTool
Smart Tool is a powerful interactive segmentation tool. Its functionality is based on the creation of a mask produced by class-agnostic segmentation model. The Smart Tool provides users with access to a wide range of Neural Network algorithms for interactive object segmentation integrated into Supervisely Annotation toolbox.
Powerful Segmentation Algorithms: The integration of a variety of Neural Networks, such as RITM, ClickSeg or new Segment Anything models, ensures high accuracy and speed of object segmentation.
Interactivity: The user can interact with the model by adjusting predictions and adding positive and negative points, which improves segmentation accuracy, quality and speed.
Data-Specific Training: Ability to train custom Smart Tool for a specific dataset without the need for programming, making it a flexible and customizable tool for annotation teams.
Combining with Other Tools: Aptitude to use additional tools such as Brush and Pen to correct model predictions and improve the overall flexibility of the annotation process.
Ease of Use: Easy to create a mask with a few mouse clicks, and the ability to quickly change object annotation classes and interactive Neural Networks used on the backend.
Find out How To Use Model Assisted Labeling To Boost Annotation Performance With Supervisely.
Tags and Properties
It is important not only to annotate objects but also to add Tags and attributes that highlight their properties. For this purpose, the tagging system is used, which allows tagging both objects and images. Want to learn more about how to use tags for image classification in Computer Vision? In our review Image and object tags for classification in Computer Vision: Complete Guide you will find a detailed explanation of the different types of tags, their functionality and how to use them in your labeling workflows.
Classification: Tags help classify images and objects, providing flexibility in description and categorization.
Data Search: Tags allow users to instantly search for data based on characteristics of interest, which is especially useful when working with large and multi-criteria datasets.
Neural Network Training: Tags are used in training Neural Networks, helping the model understand complex patterns and details, leading to more accurate predictions.
Flexibility and Personalization: Tags provide a flexible and personalized way to describe objects, as opposed to formal classifications.
Data Organization: Tags make it easier to organize data, which is useful in a variety of industries.
Collaboration: Tags provide ease of collaboration, helping teams effectively tag and manage data.
Tags in Computer Vision are used for data attribution and classification. Assigned to images or objects, tags simplify data sorting, searching and filtering, and provide important information about the content of the image. They can be applied to images or objects and are used to improve prediction accuracy in machine-learning tasks. Tag can be of different types: string value, numeric value, one-of value or just a plain attribute without a value. You can assign a hotkey to quickly select a tag you need, set color to a tag or pick whether a tag can be assigned to an image, an object, or both.
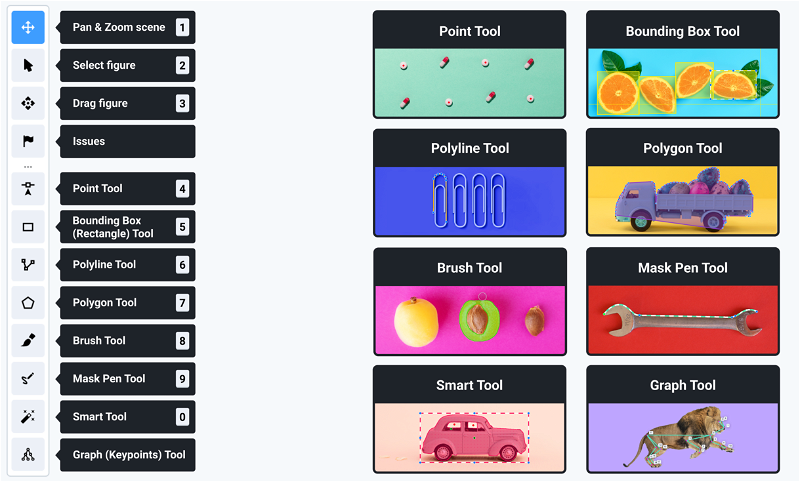
Hotkeys
There's nothing more convenient than keyboard shortcuts, the so-called Hotkeys, for switching tools, manipulating objects or adjusting visualization settings. And it's even better when you can customize the familiar combinations yourself.
 Customizable hotkeys available in the New Image Labeling Toolbox for enhanced workflow
Productivity Features
Let's take a look at the features that make the image annotation process even more efficient.
Auto-Select Objects quickly
Automatically selecting objects of the current shape when hovering over them optimizes the number of clicks required by the annotator, making the annotation process faster, more intuitive, and more convenient. This is especially beneficial when working with images that contain a large number of objects simultaneously, as it reduces the need for manual selection and streamlines the annotation workflow. By eliminating the need to manually click on each object, annotators can work more efficiently and focus on other aspects of the annotation task, resulting in improved productivity and overall user experience.
Multiple image views mode
Multi-image view mode allows you to view multiple images on the scene at once. In this mode, images are grouped by tag value. The project must contain a Tag with values like “Text” or “One of” and images for grouping must be marked with this tag. View and label grouped images together, compare annotation results or couple dependent imaginary such as medical studies (nrrd, dicom, nifti), object captured from multiple cameras, geospatial annotation or others.
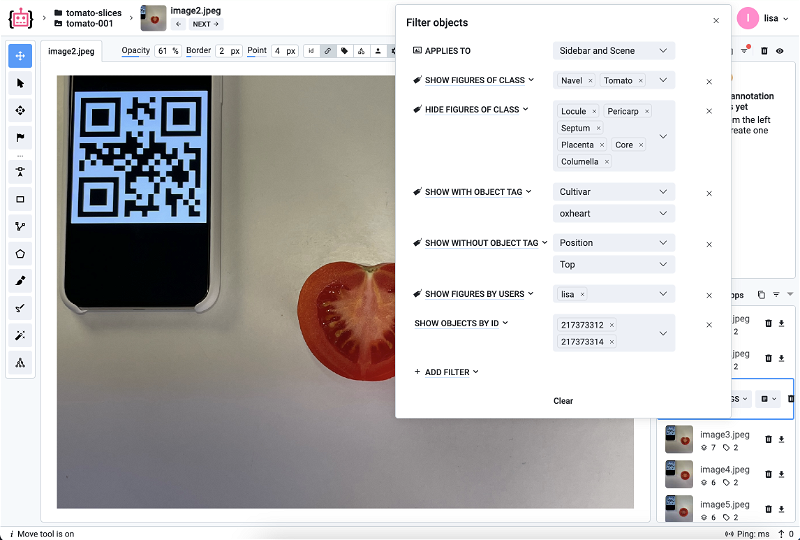
Filter images with custom conditions
Supervisely provides an extensive set of search filters for images and objects. These conditional filters combined together allow users to fine-tune search criteria according to their needs and preferences. Thanks to the flexible settings, users can quickly and efficiently find relevant images and objects in huge datasets, which greatly simplifies the process of analyzing and processing training data.
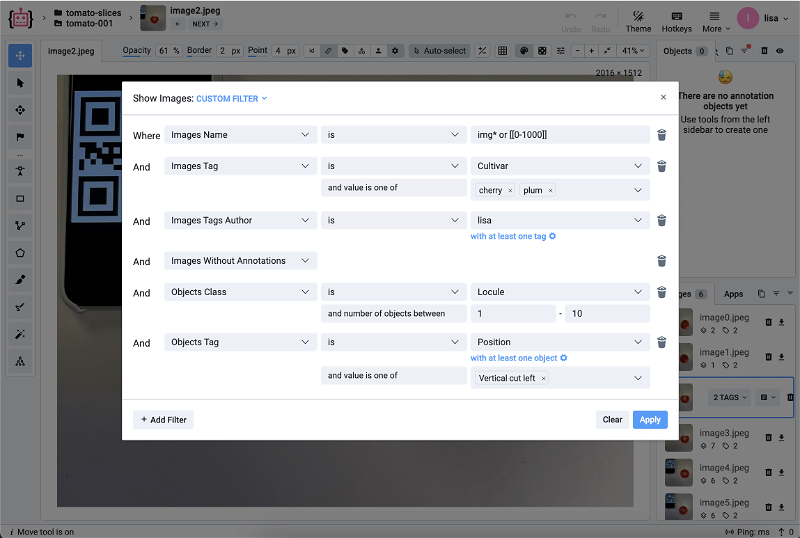 Customizing the image filters
 Customizing the object filters
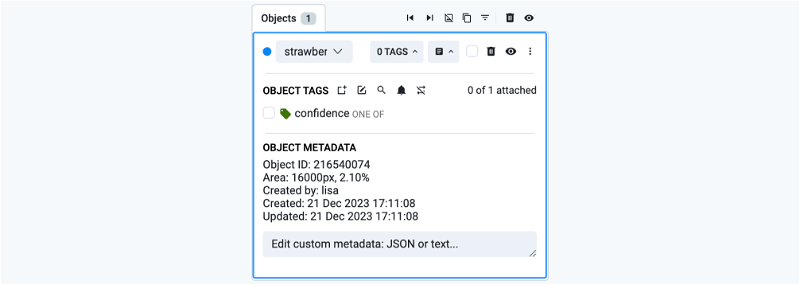
Metadata
Supervisely allows to preview and edit metadata and user custom data. This metadata represents additional information associated with images and objects, such as dimensions, formats, creation dates, and more. Custom data allows users to add custom attributes and fields to images and objects for deeper data analysis and classification. With these capabilities, users can create more informative and structured datasets. It is especially useful to store some custom integration information when customers integrate Supervisely Platform with their internal systems.
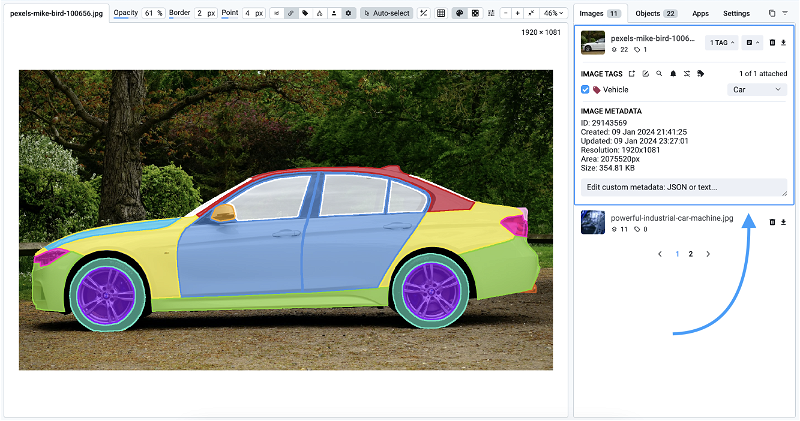 Image metadata always available
Grid
The NxM grid helps to organize the annotation order of image areas in a sequence. Configure, how many columns and rows should be in the grid, so the cell with comfortable size will provides a guidance for annotation objects on the scene. Can be used to label high-resolution images with large number of small objects, so annotators can easily navigate through the scene.
 Grid view of planting a small tree garden
Docs and labeling tips at hand
The Toolbar is more informative than ever! One of the updates to the toolbar is the addition of interactive tooltips and GIF animations. Now, when a user hovers the cursor over a tool, a tooltip appears with a brief description of the tool's functionality, accompanied by a concise GIF animation that visually demonstrates its usage.
In addition, the tooltip displays the hotkeys associated with each tool, allowing users to work faster and more effectively by using keyboard shortcuts. This improvement significantly shortens the learning curve for new users, making it easier to understand and master the use of various annotation tools.
Import & Export
Supervisely Ecosystem of Apps offers many applications that open up limitless possibilities for importing images. With these applications, users can easily import images in 50+ annotation formats and from a variety of sources, including local storage, other platforms, cloud services, websites and more. You can try them all and see for yourself.
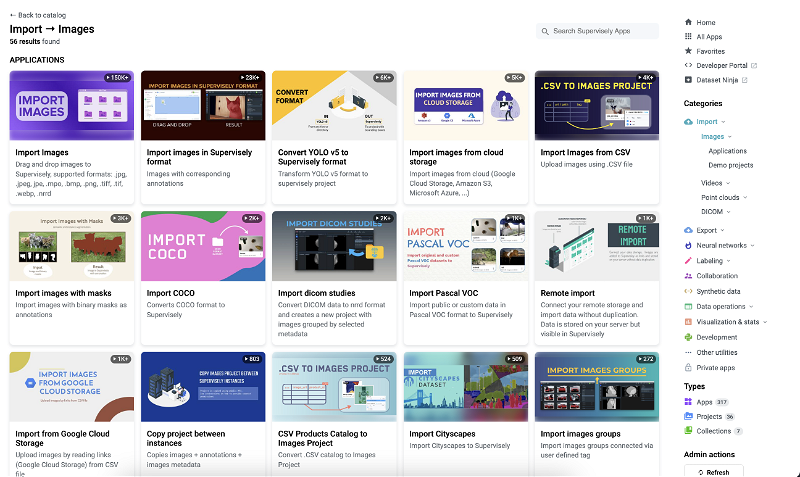 Application catalog for Import available in the Supervisely Ecosystem Apps
By default, Supervisely automatically detects the annotation format so it is really easy to upload your training datasets.
The Auto Import application quickly creates a new project and adds images, supporting a variety of formats: .jpg, .jpeg, .mpo, .bmp, .png, .webp, .tiff, .tif, .nrrd, .jfif, .avif, .heic, NIfTI, DICOM.
Supervisely also offers a variety of data export options, allowing users to easily transfer their work to different formats and prepare data for Neural Network toolboxes. Whether it is annotations, images or other data that needs to be exported, Supervisely offers applications that support multiple formats. Check out our catalog of images export applications.
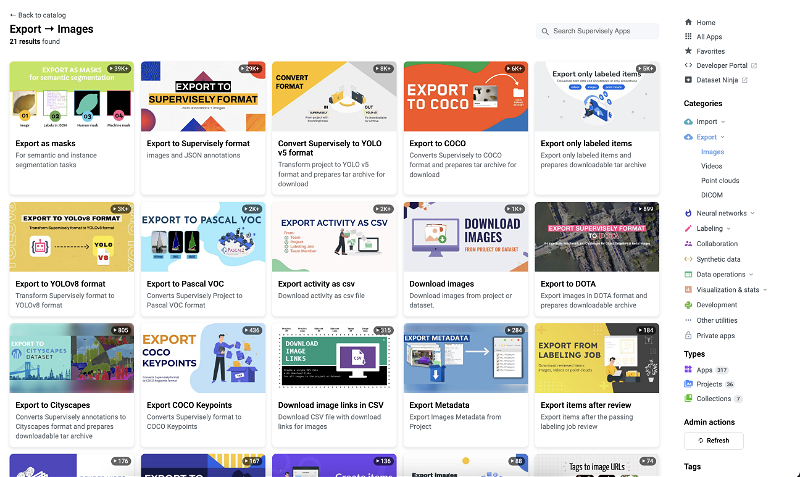 Application catalog for Export available in the Supervisely Ecosystem Apps
Integrate Any Neural Network Model
With the Supervisely Platform, users have the flexibility to seamlessly integrate a variety of Neural Network models to automate or semi-automate the annotation process within their projects. However, an additional application is required to implement the NN model in the labeling workflow.
NN Image Labeling application serves as a bridge between Neural Network (NN) models and the Image Labeling Interface within a project. Its primary function is to seamlessly integrate NN models, such as YOLOv8, OWL-ViT and other models, into the labeling workflow by automatically predicting classes and tags.

NN Image Labeling
Use deployed neural network in labeling interface
Curious about the easiest way to train a custom YOLOv8 model on your own dataset and deploy it in the browser without any coding? Check out our ultimate guide - No-code tutorial: train and predict YOLOv8 on custom data.
Dive deep into the realm of automatic image labeling with OWL-ViT - Google's state-of-the-art object detector. Learn how to automatically detect anything with just one example using OWL-ViT - one-shot open-vocabulary object detection.
Serve OWL-ViT
Class-agnostic interactive detection for auto-prelabeling
Here's an overview of its functionality and usage:
Integration with NN Models: The application allows any NN model, provided it has a properly implemented serving app (e.g., Serve MMDetection 3.0), to be integrated into the labeling interface.
Automatic Prediction of Classes and Tags: Once integrated, the app automatically adds classes and tags from the NN model predictions. This streamlines the labeling process by eliminating the need for manual addition of classes and tags from scratch.
Customization Options (New in v1.6.0): The latest version of the app introduces a new feature that allows users to add a suffix to model class/tag names, even if there are no conflicts with existing ones. This provides users with more control over how model-generated classes and tags are named.
Usage Instructions: To use the app, users need to first add it to their team from the Ecosystem. Additionally, the NN model intended for use must be deployed within the team. Users can then run the app either from the Apps page or directly within the labeling UI. It's important to note that the app doesn't support multiuser mode, meaning each user needs to run their own session. However, multiple sessions can connect to a single NN model.
Application of Model to Region of Interest (ROI) in image: The app can apply the NN model to the image area defined by the object Bounding Box (BBox). When a user selects an object of interest, the app crops the defined area and applies the model to the region of interest (ROI).
Collaborative Teamwork
Collaborate together with your team to transform existing assets into labeled data, trained models and deployed solutions. Supervisely helps to organize work of different professionals: labelers, data scientists, domain experts, managers and engineers. Distribute annotation work between colleagues using labeling jobs or labeling queues.
Utilizing the labeling tasks and collaborative tools within Supervisely greatly enhances organizational efficiency and facilitates the successful completion of various tasks, such as:
-
Job Management - clearly defining tasks, specifying object types for annotation, and outlining annotation guidelines.
-
Progress Monitoring - tracking the status of annotations and reviewing completed tasks to ensure quality and accuracy.
-
Roles and Access permissions - implementing precise access permissions, restricting access to designated datasets and classes within each job, ensuring data security and integrity.
Moreover, users can conveniently capture screenshots for urgent tasks directly within the platform, eliminating the need for external applications, and effortlessly sharing the generated link for swift collaboration.
Quality Assurance for your data
Supervisely is excited to introduce its newest integration with the interactive statistics available for your custom dataset in a single click.
With this app, users can now explore annotations easily, ensuring that their datasets stay accurate and perform quality assurance. No more need for manual recalculations; our app automates the process, allowing users to concentrate on deriving valuable insights from their data.
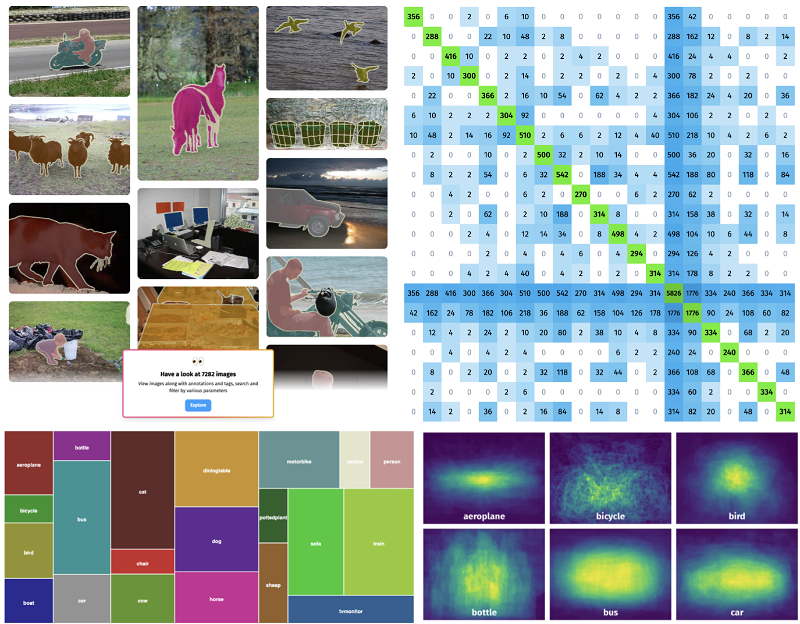 Integrated Dataset Ninja's dynamic heatmap charts, treemaps, and spatial heatmaps for immersive statistical analysis and visualization
Real-time stats: Bid farewell to time consuming updates. Our app utilizes an efficient system that smoothly integrates new or revised data with existing annotations, guaranteeing that project statistics are always up to date.
In depth Statistics Analysis: Gain profound understanding of your dataset with a wide range of statistics. From analyzing class distribution and confusion matrix to studying image and object properties, this app equips you with all the essentials for comprehending your data at a glance.
Interactive Data Visualizations: Dive into your dataset like never before through interactive heatmap charts, treemaps and spatial heatmaps. These visualizations offer valuable insights into how objects are distributed and arranged spatially within your images. Our application features a user-friendly interface that simplifies the process of navigating and analyzing your data. Whether you're an experienced data scientist or just starting out, you'll find our app easy to understand and use.
Visualization Settings
Let's delve deeper into each feature of Supervisely Annotation Toolbox presented above!
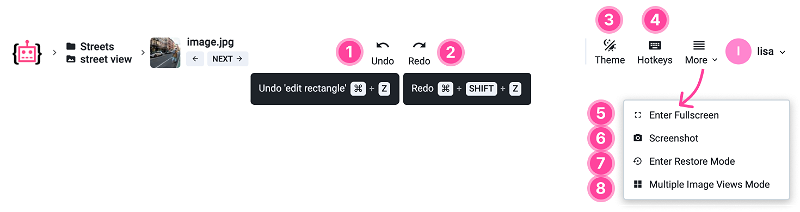
Graphical User Interface (GUI)
The updated layout offers users a variety of customization choices, establishing an easy-to-use annotation environment that can be adjusted to suit individual preferences whenever needed. This adaptability enables each user to design a personalized labeling workspace, enhancing the enjoyment of the data annotation process.
Explore basic interface elements:
-
Undo | The Undo function allows you to undo the user's last action. If the user makes a mistake or wants to return to a previous labeling step, he can use the Undo function to revert the last step.
-
Redo | The Redo function is used to return an undone action. If the user decides to return to a previous state of image annotation after using Undo, they can use Redo to restore that action.
Both features provide flexibility, allowing users to experiment with various labeling options and quickly revert to a previous state if they make a mistake.
-
Select Theme (Dark or Light) | Ability to switch between light and dark interface themes, especially useful for those who prefer to work at night 🦉☕.
-
Hotkeys | List of hotkeys that speed up the labeling process.
-
Full-Screen Mode | Ability to switch to full-screen mode for easier image annotation by maximizing the working area on the screen.
-
Screenshot | Ability to take screenshots of the visible working area and share them with colleagues.
-
Restore Mode | Restore mode allows you to undo changes or restore previous versions of annotations, by restoring deleted objects that have ever been created in this project.
-
Multi-view Image Mode | Ability to view multiple images on a scene at once. In this mode, images are grouped by tag value. The project must contain a Tag with values like “Text” or “One of” and images for grouping must be marked with this tag.
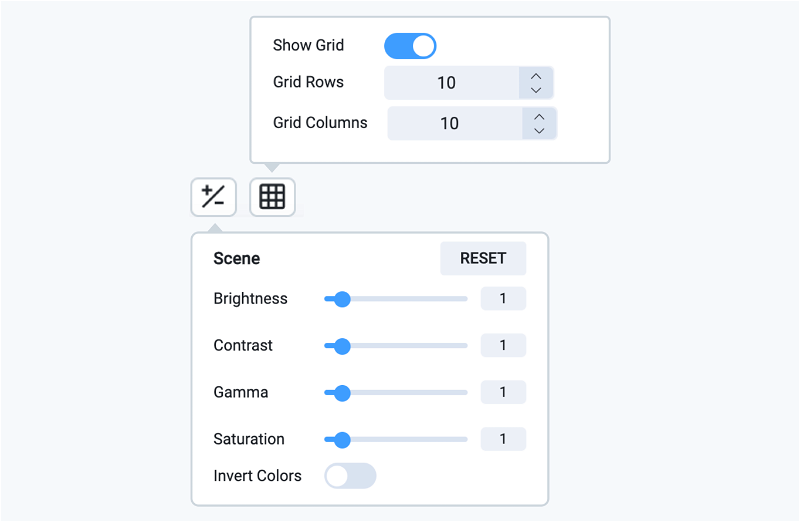
Labeling Scene Settings
The latest update introduces improvements in organizing all visualization settings to unified panel. By combining all sliders and buttons in one location, users can now experience a seamless flow when performing labeling tasks, thus significantly reducing the time and effort spent navigating through multiple windows and menus.
 Hovering over each function displays a brief description of its functionality
Annotation display settings
Opacity: To modify the transparency of objects, hold and drag the cursor left or right. This allows for a more nuanced view of the objects' layers. Additionally, you can hold the SHIFT key and scroll the mouse wheel to adjust the opacity conveniently from anywhere on the screen.
Border: Enhance the visibility of object boundaries by holding and dragging the cursor left or right. This action changes the width of the objects' borders, allowing for clearer demarcation. Useful when working with huge resolutions or with large number of small objects
Point: Adjust the radius of object points by holding and dragging the cursor left or right.

Default color: Paint objects with their original colors as defined in class settings. This is the default setting and helps maintain consistency and recognition. So the objects of different classes are visually distinguishable.
Randomize color: Randomize object colors to distinguish between objects of the same class. A simple click, followed by SHIFT+H, randomizes the object's colors. Can be used in Instance Segmentation Computer Vision task to highlight visual distinction of all objects of the same class on an image.

Attribute display settings for clearer context
ID: Toggle the visibility of object IDs near the objects on the scene. This is essential for identifying and referring to specific objects.
Bindings: Show or hide bindings near objects to understand how various elements are connected to each other. Objects can be combined into groups.
Tags: Display tags near objects to provide additional context or categorization.
Classes: Enable visibility of the classes assigned to each object, helping in the classification and organization of scene elements.
Creator: Display the creator's name near the objects to acknowledge object authorship.

Change Visibility Mode: This option allows users to switch between different visibility modes, optimizing the scene display as per the user's preference. You can choose how to show the attributes:
-
Always | Users can select full tag display, which means that the information will be visible directly on Objects or Images in the project.
-
Show on hover | Tags are only displayed when the cursor is hovered over the annotated object.
-
Show when selected | The ability to hide Tags until the Object is selected provides a cleaner look and feel to the interface and prevents information overload when working with a project.
Advanced interaction with scene objects
Auto-select: Automatically select objects of the current shape when hovering the cursor over them.

Customizing image display settings
Scene display settings: Adjust scene display settings like brightness or contrast to suit different viewing conditions or preferences. For example, you can use them while annotation dark or low-contrast images.
Grid: A grid helps organize the navigation on the images with high resolutions and large number of small objects.
Visibility and image sizing
The ability to hide annotation settings declutters the workspace, focusing attention on the task at hand.
Real-time image resizing adapts to various project needs, ensuring optimal viewing and editing conditions. Just zoom-in or out on the images to see object details and perform precise labeling of object boundaries.

Images and Objects windows
These are interactive collapsed panels within the interface that display additional information that is not needed all the time. Each window has a distinct purpose, contributing to simplification of basic UI and improvement of the user's experience.
Objects props and ops
The Objects Window is a dynamic space dedicated to showcasing and managing objects tags, attributes and metadata.
Here are some of the features it offers:
Clone Objects. Easily replicate selected objects to the next image with a simple right arrow key press or bring objects from the previous image.
Filter and Manage. Quickly filter objects, remove all from the image, or toggle their visibility according to your needs. For example you can hide all objects except of the specific class.
Advanced Interactions. Select, delete, hide, merge objects, or adjust their layering. Additionally, you can modify metadata and assign or manage tags right from this window, enhancing the object's data with minimal effort.
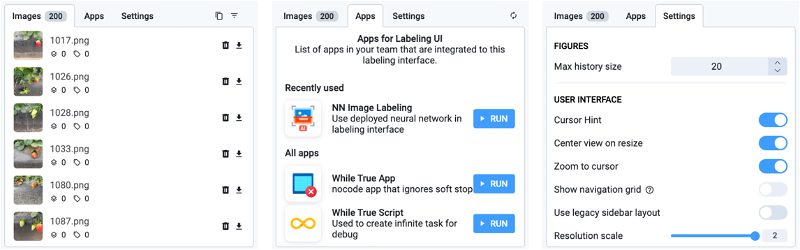
Images window
The Images Window provides a comprehensive view of all the images within a selected dataset. Key functionalities include:
Tag Management. Clone tags from the previous image, assign new ones, or modify existing tags to maintain consistency and organization.
Filter and Manage. View and edit metadata details or filter through images to find exactly what you need.
Image Operations. Delete images, download them individually, or download annotations for external use.
Apps Window: expand your capabilities
In an ever-evolving ML landscape, the Apps Window serves as a portal to a wide range of applications from the Computer Vision Ecosystem, enhancing the functionality of your workspace. This window allows you to run and open the public or private apps and extend the Labeling Toolbox with custom UI and functionality.
Python developers can write custom apps, handle the triggered event from the labeling in real-time and embed its graphical user interface providing a smooth experience. So the labeler will see and feel this embedded functionality as out-of-the-box features.
Settings Window: customize your experience
Lastly, the Settings Window is the control center for personalizing the interface. It houses various options allowing users to tweak the interface to match their workflow, preferences, and project requirements.
Conclusion
As we wrap up our series, it's clear that the New Image Labeling Toolbox is a game-changer in the world of image annotation. With its user-centric design, comprehensive features, and proven efficiency, it stands poised to become the best tool on the market. We invite you to try our new powerful Image Labeling Toolbox on your custom Computer Vision project.
Supervisely for Computer Vision
Supervisely is online and on-premise platform that helps researchers and companies to build computer vision solutions. We cover the entire development pipeline: from data labeling of images, videos and 3D to model training.
The big difference from other products is that Supervisely is built like an OS with countless Supervisely Apps — interactive web-tools running in your browser, yet powered by Python. This allows to integrate all those awesome open-source machine learning tools and neural networks, enhance them with user interface and let everyone run them with a single click.
You can order a demo or try it yourself for free on our Community Edition — no credit card needed!
Liked this blog post? Share it!


Subscribe to new blog posts
Table of Contents
🤖 Try Supervisely: it's free!
Full stack platform with hundreds of Apps ready to solve any computer vision task: from labeling to model training. Create account


